

看完这一篇,你就对 Spring Security 略窥门径了


作者 | BoCong-Deng
来源 | CSDN 博客,责编 | 夕颜
头图 | CSDN 下载自东方 IC
出品 | CSDN(ID:CSDNnews)
写在前面
开发Web应用,对页面的安全控制通常是必须的。比如:对于没有访问权限的用户需要转到登录表单页面。要实现访问控制的方法多种多样,可以通过Aop、拦截器实现,也可以通过框架实现,例如:Apache Shiro、Spring Security。我们这里要讲的Spring Security 就是一个Spring生态中关于安全方面的框架。它能够为基于Spring的企业应用系统提供声明式的安全访问控制解决方案。

默认认证用户名密码
项目pom.xml添加spring-boot-starter-security依赖
1<dependency>
2    <groupId>org.springframework.boot</groupId>
3    <artifactId>spring-boot-starter-security</artifactId>
4</dependency>
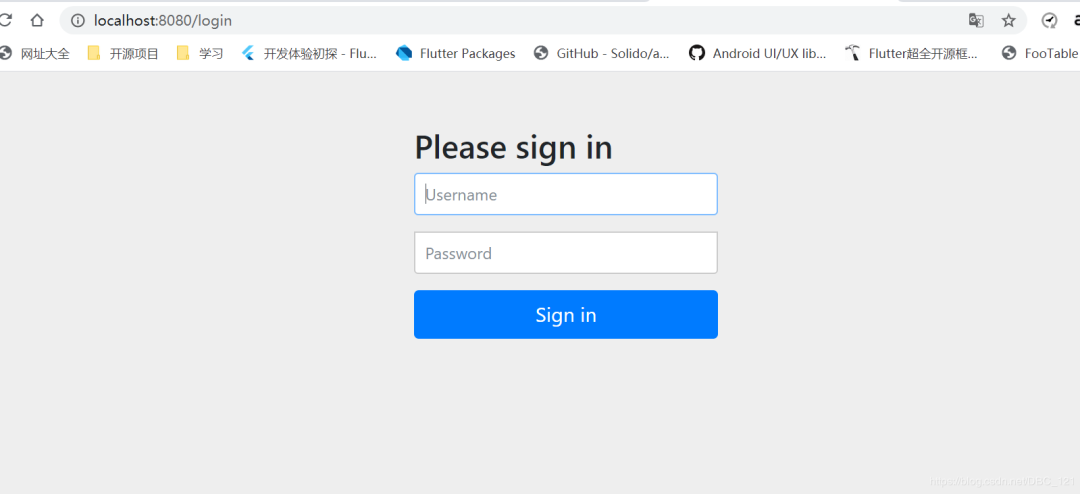
重启你的应用。再次打开页面,你讲看到一个登录页面
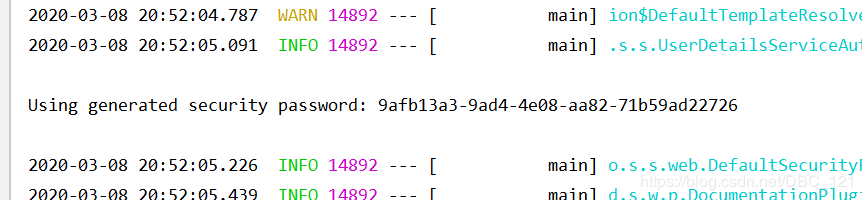
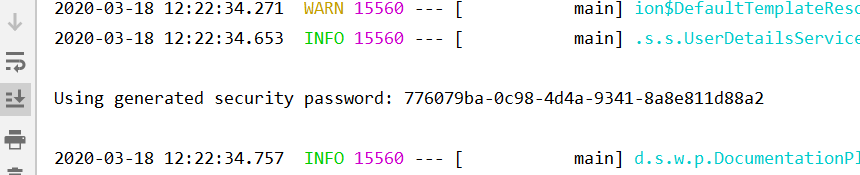
既然跳到了登录页面,那么这个时候我们就会想,这个登录的用户名以及密码是什么呢?让我们来从SpringBoot源码寻找一下。你搜一下输出日志,会看到下面一段输出:
这段日志是UserDetailsServiceAutoConfiguration类里面的如下方法输出的:
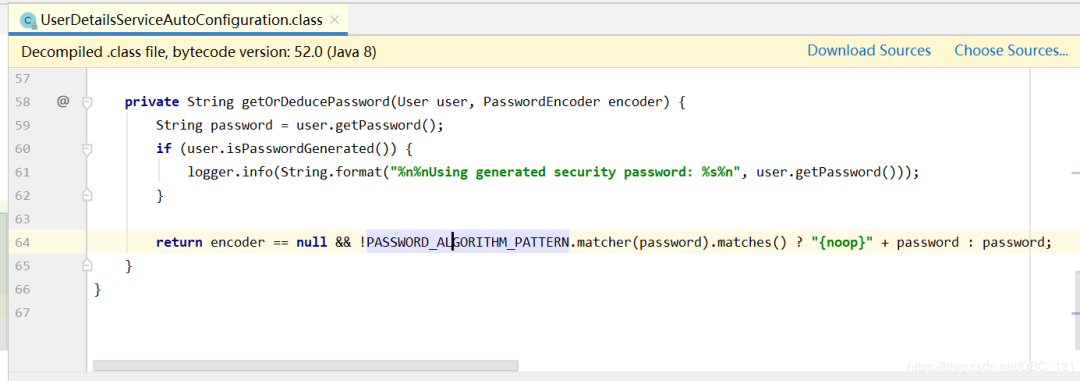
通过上面的这个类,我们可以看出,是SecurityProperties这个Bean管理了用户名和密码。在SecurityProperties里面的一个内部静态类User类里面,管理了默认的认证的用户名与密码。代码如下
 1@ConfigurationProperties(
2    prefix = "spring.security"
3)
4public class SecurityProperties {
5    public static final int BASIC_AUTH_ORDER = 2147483642;
6    public static final int IGNORED_ORDER = -2147483648;
7    public static final int DEFAULT_FILTER_ORDER = -100;
8    private final SecurityProperties.Filter filter = new SecurityProperties.Filter();
9    private SecurityProperties.User user = new SecurityProperties.User();
10
11    public SecurityProperties() {
12    }
13
14    public SecurityProperties.User getUser() {
15        return this.user;
16    }
17
18    public SecurityProperties.Filter getFilter() {
19        return this.filter;
20    }
21
22    public static class User {
23        private String name = "user";
24        private String password = UUID.randomUUID().toString();
25        private List<String> roles = new ArrayList();
26        private boolean passwordGenerated = true;
27
28        public User() {
29        }
30
31        public String getName() {
32            return this.name;
33        }
34
35        public void setName(String name) {
36            this.name = name;
37        }
38
39        public String getPassword() {
40            return this.password;
41        }
42
43        public void setPassword(String password) {
44            if (StringUtils.hasLength(password)) {
45                this.passwordGenerated = false;
46                this.password = password;
47            }
48        }
49
50        public List<String> getRoles() {
51            return this.roles;
52        }
53
54        public void setRoles(List<String> roles) {
55            this.roles = new ArrayList(roles);
56        }
57
58        public boolean isPasswordGenerated() {
59            return this.passwordGenerated;
60        }
61    }
62
63    public static class Filter {
64        private int order = -100;
65        private Set<DispatcherType> dispatcherTypes;
66
67        public Filter() {
68            this.dispatcherTypes = new HashSet(Arrays.asList(DispatcherType.ASYNC, DispatcherType.ERROR, DispatcherType.REQUEST));
69        }
70
71        public int getOrder() {
72            return this.order;
73        }
74
75        public void setOrder(int order) {
76            this.order = order;
77        }
78
79        public Set<DispatcherType> getDispatcherTypes() {
80            return this.dispatcherTypes;
81        }
82
83        public void setDispatcherTypes(Set<DispatcherType> dispatcherTypes) {
84            this.dispatcherTypes = dispatcherTypes;
85        }
86    }
87}
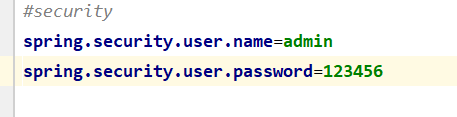
综上所述,security默认的用户名是user, 默认密码是应用启动的时候,通过UUID算法随机生成的,默认的role是"USER"。当然,如果我们想简单改一下这个用户名密码,可以在application.properties配置你的用户名密码,例如
当然这只是一个初级的配置,更复杂的配置,可以分不用角色,在控制范围上,能够拦截到方法级别的权限控制。

内存用户名密码认证
在上面的内容,我们什么都没做,就添加了spring-boot-starter-security依赖,整个应用就有了默认的认证安全机制。下面,我们来定制用户名密码。写一个继承了 WebSecurityConfigurerAdapter的配置类,具体内容如下
 1import org.springframework.context.annotation.Configuration;
2import org.springframework.security.config.annotation.authentication.builders.AuthenticationManagerBuilder;
3import org.springframework.security.config.annotation.method.configuration.EnableGlobalMethodSecurity;
4import org.springframework.security.config.annotation.web.builders.HttpSecurity;
5import org.springframework.security.config.annotation.web.configuration.EnableWebSecurity;
6import org.springframework.security.config.annotation.web.configuration.WebSecurityConfigurerAdapter;
7
8@Configuration
9@EnableWebSecurity
10@EnableGlobalMethodSecurity(prePostEnabled = true, securedEnabled = true, jsr250Enabled = true)
11public class WebSecurityConfig extends WebSecurityConfigurerAdapter {
12    @Override
13    protected void configure(HttpSecurity http) throws Exception {
14        super.configure(http);
15    }
16
17    @Override
18    protected void configure(AuthenticationManagerBuilder auth) throws Exception {
19        auth.inMemoryAuthentication()
20                .passwordEncoder(new BCryptPasswordEncoder())
21                .withUser("admin")
22                .password(new BCryptPasswordEncoder().encode("1234567"))
23                .roles("USER");
24    }
25}
这里对上面的代码进行简要说明:
-
Spring security 5.0中新增了多种加密方式,也改变了默认的密码格式。需要修改一下configure中的代码,我们要将前端传过来的密码进行某种方式加密,Spring Security 官方推荐的是使用bcrypt加密方式。inMemoryAuthentication().passwordEncoder(new BCryptPasswordEncoder()),这相当于登陆时用BCrypt加密方式对用户密码进行处理。以前的".password("123")" 变成了 “.password(new BCryptPasswordEncoder().encode("123"))”,这相当于对内存中的密码进行Bcrypt编码加密。如果比对时一致,说明密码正确,才允许登陆。
-
通过 @EnableWebSecurity注解开启Spring Security的功能。使用@EnableGlobalMethodSecurity(prePostEnabled = true)这个注解,可以开启security的注解,我们可以在需要控制权限的方法上面使用@PreAuthorize,@PreFilter这些注解。
-
继承 WebSecurityConfigurerAdapter 类,并重写它的方法来设置一些web安全的细节。我们结合@EnableWebSecurity注解和继承WebSecurityConfigurerAdapter,来给我们的系统加上基于web的安全机制。
-
在configure(HttpSecurity http)方法里面,我们进入到源码中,就会看到默认的认证代码是:

从方法名我们基本可以看懂这些方法的功能。上面的那个默认的登录页面,就是SpringBoot默认的用户名密码认证的login页面。我们使用SpringBoot默认的配置super.configure(http),它通过 authorizeRequests() 定义哪些URL需要被保护、哪些不需要被保护。默认配置是所有访问页面都需要认证,才可以访问。
-
通过 formLogin() 定义当需要用户登录时候,转到的登录页面。
-
configureGlobal(AuthenticationManagerBuilder auth) 方法,在内存中创建了一个用户,该用户的名称为root,密码为root,用户角色为USER。这个默认的登录页面是怎么冒出来的呢?是的,SpringBoot内置的,SpringBoot甚至给我们做好了一个极简的登录页面。这个登录页面是通过Filter实现的。具体的实现类是org.springframework.security.web.authentication.ui.DefaultLoginPageGeneratingFilter。同时,这个DefaultLoginPageGeneratingFilter也是SpringBoot的默认内置的Filter。
输入用户名,密码,点击Login。不过,我们发现,SpringBoot应用的启动日志还是打印了如下一段:
但实际上,已经使用了我们定制的用户名密码了。如果我们要配置多个用户,多个角色,可参考使用如下示例的代码:
 1@Override
2    protected void configure(AuthenticationManagerBuilder auth) throws Exception {
3        auth.inMemoryAuthentication()
4                .passwordEncoder(new BCryptPasswordEncoder())
5                .withUser("admin")
6                .password(new BCryptPasswordEncoder().encode("1234567"))
7                .roles("USER")
8                .and()
9                .withUser("admin1")
10                .password(new BCryptPasswordEncoder().encode("123"))
11                .roles("ADMIN", "USER");
12    }

角色权限控制
当我们的系统功能模块当需求发展到一定程度时,会不同的用户,不同角色使用我们的系统。这样就要求我们的系统可以做到,能够对不同的系统功能模块,开放给对应的拥有其访问权限的用户使用。Spring Security提供了Spring EL表达式,允许我们在定义URL路径访问(@RequestMapping)的方法上面添加注解,来控制访问权限。在标注访问权限时,根据对应的表达式返回结果,控制访问权限:
1true,表示有权限
2fasle,表示无权限
Spring Security可用表达式对象的基类是SecurityExpressionRoot。
  1public abstract class SecurityExpressionRoot implements SecurityExpressionOperations {
2    protected final Authentication authentication;
3    private AuthenticationTrustResolver trustResolver;
4    private RoleHierarchy roleHierarchy;
5    private Set<String> roles;
6    private String defaultRolePrefix = "ROLE_";
7    public final boolean permitAll = true;
8    public final boolean denyAll = false;
9    private PermissionEvaluator permissionEvaluator;
10    public final String read = "read";
11    public final String write = "write";
12    public final String create = "create";
13    public final String delete = "delete";
14    public final String admin = "administration";
15
16    public SecurityExpressionRoot(Authentication authentication) {
17        if (authentication == null) {
18            throw new IllegalArgumentException("Authentication object cannot be null");
19        } else {
20            this.authentication = authentication;
21        }
22    }
23
24    public final boolean hasAuthority(String authority) {
25        return this.hasAnyAuthority(authority);
26    }
27
28    public final boolean hasAnyAuthority(String... authorities) {
29        return this.hasAnyAuthorityName((String)null, authorities);
30    }
31
32    public final boolean hasRole(String role) {
33        return this.hasAnyRole(role);
34    }
35
36    public final boolean hasAnyRole(String... roles) {
37        return this.hasAnyAuthorityName(this.defaultRolePrefix, roles);
38    }
39
40    private boolean hasAnyAuthorityName(String prefix, String... roles) {
41        Set<String> roleSet = this.getAuthoritySet();
42        String[] var4 = roles;
43        int var5 = roles.length;
44
45        for(int var6 = 0; var6 < var5; ++var6) {
46            String role = var4[var6];
47            String defaultedRole = getRoleWithDefaultPrefix(prefix, role);
48            if (roleSet.contains(defaultedRole)) {
49                return true;
50            }
51        }
52
53        return false;
54    }
55
56    public final Authentication getAuthentication() {
57        return this.authentication;
58    }
59
60    public final boolean permitAll() {
61        return true;
62    }
63
64    public final boolean denyAll() {
65        return false;
66    }
67
68    public final boolean isAnonymous() {
69        return this.trustResolver.isAnonymous(this.authentication);
70    }
71
72    public final boolean isAuthenticated() {
73        return !this.isAnonymous();
74    }
75
76    public final boolean isRememberMe() {
77        return this.trustResolver.isRememberMe(this.authentication);
78    }
79
80    public final boolean isFullyAuthenticated() {
81        return !this.trustResolver.isAnonymous(this.authentication) && !this.trustResolver.isRememberMe(this.authentication);
82    }
83
84    public Object getPrincipal() {
85        return this.authentication.getPrincipal();
86    }
87
88    public void setTrustResolver(AuthenticationTrustResolver trustResolver) {
89        this.trustResolver = trustResolver;
90    }
91
92    public void setRoleHierarchy(RoleHierarchy roleHierarchy) {
93        this.roleHierarchy = roleHierarchy;
94    }
95
96    public void setDefaultRolePrefix(String defaultRolePrefix) {
97        this.defaultRolePrefix = defaultRolePrefix;
98    }
99
100    private Set<String> getAuthoritySet() {
101        if (this.roles == null) {
102            Collection<? extends GrantedAuthority> userAuthorities = this.authentication.getAuthorities();
103            if (this.roleHierarchy != null) {
104                userAuthorities = this.roleHierarchy.getReachableGrantedAuthorities(userAuthorities);
105            }
106
107            this.roles = AuthorityUtils.authorityListToSet(userAuthorities);
108        }
109
110        return this.roles;
111    }
112
113    public boolean hasPermission(Object target, Object permission) {
114        return this.permissionEvaluator.hasPermission(this.authentication, target, permission);
115    }
116
117    public boolean hasPermission(Object targetId, String targetType, Object permission) {
118        return this.permissionEvaluator.hasPermission(this.authentication, (Serializable)targetId, targetType, permission);
119    }
120
121    public void setPermissionEvaluator(PermissionEvaluator permissionEvaluator) {
122        this.permissionEvaluator = permissionEvaluator;
123    }
124
125    private static String getRoleWithDefaultPrefix(String defaultRolePrefix, String role) {
126        if (role == null) {
127            return role;
128        } else if (defaultRolePrefix != null && defaultRolePrefix.length() != 0) {
129            return role.startsWith(defaultRolePrefix) ? role : defaultRolePrefix + role;
130        } else {
131            return role;
132        }
133    }
134}
通过阅读源码,我们可以更加深刻的理解其EL写法,并在写代码的时候正确的使用。变量defaultRolePrefix硬编码约定了role的前缀是"ROLE_"。同时,我们可以看出hasRole跟hasAnyRole是一样的。hasAnyRole是调用的hasAnyAuthorityName(defaultRolePrefix, roles)。所以,我们在学习一个框架或者一门技术的时候,最准确的就是源码。通过源码,我们可以更好更深入的理解技术的本质。
SecurityExpressionRoot为我们提供的使用Spring EL表达式总结如下:

在Controller方法上添加@PreAuthorize这个注解,value="hasRole('ADMIN')")是Spring-EL expression,当表达式值为true,标识这个方法可以被调用。如果表达式值是false,标识此方法无权限访问。

在Spring Security里获取当前登录认证通过的用户信息
如果我们想要在前端页面显示当前登录的用户怎么办呢?在在Spring Security里面怎样获取当前登录认证通过的用户信息?下面我们就来探讨这个问题。其实很好办。我们添加一个LoginFilter,默认拦截所有请求,把当前登录的用户放到系统session中即可。在Spring Security中,用户信息保存在SecurityContextHolder中。Spring Security使用一个Authentication对象来持有所有系统的安全认证相关的信息。这个信息的内容格式如下:
 1{
2    "accountNonExpired":true,
3    "accountNonLocked":true,
4    "authorities":[{
5        "authority":"ROLE_ADMIN"
6    },{
7        "authority":"ROLE_USER"
8    }],
9    "credentialsNonExpired":true,
10    "enabled":true,
11    "username":"root"
12}
这个Authentication对象信息其实就是User实体的信息,类似如下(当然,密码没放进来)。
 1public class User implements UserDetails, CredentialsContainer {
2    private String password;
3    private final String username;
4    private final Set<GrantedAuthority> authorities;
5    private final boolean accountNonExpired;
6    private final boolean accountNonLocked;
7    private final boolean credentialsNonExpired;
8    private final boolean enabled;
9        ....
10}
我们可以使用下面的代码(Java)获得当前身份验证的用户的名称:
1Object principal = SecurityContextHolder.getContext().getAuthentication().getPrincipal();
2
3if (principal instanceof UserDetails) {
4    String username = ((UserDetails)principal).getUsername();
5} else {
6    String username = principal.toString();
7}
通过调用getContext()返回的对象是SecurityContext的实例对象,该实例对象保存在ThreadLocal线程本地存储中。使用Spring Security框架,通常的认证机制都是返回UserDetails实例,通过如上这种方式,我们就可以拿到认证登录的用户信息。

用数据库存储用户和角色,实现安全认证
很多时候,我们需要的是实现一个用数据库存储用户和角色,实现系统的安全认证。为了简化讲解,本例中在权限角色上,我们简单设计两个用户角色:USER,ADMIN。我们设计页面的权限如下:
-
首页/ : 所有人可访问
-
登录页 /login: 所有人可访问
-
普通用户权限页 /httpapi, /httpsuite: 登录后的用户都可访问
-
管理员权限页 /httpreport :仅管理员可访问
-
无权限提醒页:当一个用户访问了其没有权限的页面,我们使用全局统一的异常处理页面提示。
配置Spring Security
我们首先使用Spring Security帮我们做登录、登出的处理,以及当用户未登录时只能访问: http://localhost:8080/ 以及 http://localhost:8080/login 两个页面。同样的,我们要写一个继承WebSecurityConfigurerAdapter的配置类:
 1import com.springboot.in.action.service.LightSwordUserDetailService;
2import org.springframework.context.annotation.Bean;
3import org.springframework.context.annotation.Configuration;
4import org.springframework.security.config.annotation.authentication.builders.AuthenticationManagerBuilder;
5import org.springframework.security.config.annotation.method.configuration.EnableGlobalMethodSecurity;
6import org.springframework.security.config.annotation.web.builders.HttpSecurity;
7import org.springframework.security.config.annotation.web.configuration.EnableWebSecurity;
8import org.springframework.security.config.annotation.web.configuration.WebSecurityConfigurerAdapter;
9import org.springframework.security.core.userdetails.UserDetailsService;
10
11/**
12 * Created by jack on 2017/4/27.
13 */
14
15@Configuration
16@EnableWebSecurity
17@EnableGlobalMethodSecurity(prePostEnabled = true, securedEnabled = true, jsr250Enabled = true)
18//使用@EnableGlobalMethodSecurity(prePostEnabled = true)
19// 这个注解,可以开启security的注解,我们可以在需要控制权限的方法上面使用@PreAuthorize,@PreFilter这些注解。
20public class WebSecurityConfig extends WebSecurityConfigurerAdapter {
21    @Override
22    @Bean
23    public UserDetailsService userDetailsService() { //覆盖写userDetailsService方法 (1)
24        return new AdminUserDetailService();
25
26    }
27
28    /**
29     * If subclassed this will potentially override subclass configure(HttpSecurity)
30     *
31     * @param http
32     * @throws Exception
33     */
34    @Override
35    protected void configure(HttpSecurity http) throws Exception {
36        //super.configure(http);
37        http.csrf().disable();
38
39        http.authorizeRequests()
40            .antMatchers("/").permitAll()
41            .antMatchers("/amchart/**",
42                "/bootstrap/**",
43                "/build/**",
44                "/css/**",
45                "/dist/**",
46                "/documentation/**",
47                "/fonts/**",
48                "/js/**",
49                "/pages/**",
50                "/plugins/**"
51            ).permitAll() //默认不拦截静态资源的url pattern (2)
52            .anyRequest().authenticated().and()
53            .formLogin().loginPage("/login")// 登录url请求路径 (3)
54            .defaultSuccessUrl("/httpapi").permitAll().and() // 登录成功跳转路径url(4)
55            .logout().permitAll();
56
57        http.logout().logoutSuccessUrl("/"); // 退出默认跳转页面 (5)
58
59    }
60
61    @Override
62    protected void configure(AuthenticationManagerBuilder auth) throws Exception {
63        //AuthenticationManager使用我们的 Service来获取用户信息,Service可以自己写,其实就是简单的读取数据库的操作
64        auth.userDetailsService(()); // (6)
65    }
66
67}
上面的代码只做了基本的配置,其中:
-
覆盖写userDetailsService方法,具体的AdminUserDetailsService实现类,就是之前说的获取用户信息的service层类。
-
默认不拦截静态资源的url pattern。我们也可以用下面的WebSecurity这个方式跳过静态资源的认证。
1public void configure(WebSecurity web) throws Exception {
2    web
3        .ignoring()
4        .antMatchers("/resourcesDir/**");
5}
-
跳转登录页面url请求路径为/login,我们需要定义一个Controller把路径映射到login.html。
-
登录成功后跳转的路径为/httpapi
-
退出后跳转到的url为/
-
认证鉴权信息的Bean,采用我们自定义的从数据库中获取用户信息的AdminUserDetailService类。
我们同样使用@EnableGlobalMethodSecurity(prePostEnabled = true)这个注解,开启security的注解,这样我们可以在需要控制权限的方法上面使用@PreAuthorize,@PreFilter这些注解。
用户退出
我们在configure(HttpSecurity http)方法里面定义了任何权限都允许退出,当然SpringBoot集成Security的默认退出请求是/logout
1http.logout().logoutSuccessUrl("/"); // 退出默认跳转页面 (4)
配置错误处理页面
访问发生错误时,跳转到系统统一异常处理页面。我们首先添加一个GlobalExceptionHandlerAdvice,使用@ControllerAdvice注解:
 1import org.springframework.web.bind.annotation.{ControllerAdvice, ExceptionHandler}
2import org.springframework.web.context.request.WebRequest
3import org.springframework.web.servlet.ModelAndView
4
5/**
6  * Created by jack on 2017/4/27.
7  */
8@ControllerAdvice
9class GlobalExceptionHandlerAdvice {
10  @ExceptionHandler(value = Exception.class)//表示捕捉到所有的异常,你也可以捕捉一个你自定义的异常
11    public ModelAndView exception(Exception exception, WebRequest request){
12        ModelAndView modelAndView = new ModelAndView("/error");
13        modelAndView.addObject("errorMessage", exception.getMessage());
14        modelAndView.addObject("stackTrace", exception.getStackTrace());
15        return modelAndView;
16    }
17}
其中,@ExceptionHandler(value = Exception.class),表示捕捉到所有的异常,这里你也可以捕捉一个你自定义的异常。比如说,针对安全认证的Exception,我们可以单独定义处理。此处不再赘述。
原文链接:
https://blog.csdn.net/DBC_121/article/details/104740273
![]()
![]()
为了让大家更好地了解开发者,CSDN特发起“开发者与AI大调查”活动。 点击阅读原文,填写调查问卷,您将获得价值299元的「2020 AI 开发者万人大会」在线直播门票一张哟~

推荐阅读:为何你的 SaaS 想法总是失败?没想清楚这 4 个原因可能会继续失败!
如何给女朋友解释什么是撞库、脱库和洗库?
开源的未来 10 年:中国开源社区建立是关键
万字好文:智能合约编写之Solidity的编程攻略,建议收藏!
Python 爬取疫情期间全球股市走向,笑不出来......
无代码时代来临,程序员如何保住饭碗?
真香,朕在看了!
微信扫描下方的二维码阅读更多精彩内容

每日分享到群里,或者推荐给朋友会得大量积分,机会可以兑换微信零钱红包,具体请点击这里,得到了微信红包可以用来支持大飞哥
大飞哥能不能加鸡腿就看各位了!

开发者微信

开发者微信反馈BUG或者VIP可以添加,其他情况反馈可能不及时,见谅
版权声明
初衷是提供高清手机电脑壁纸等图片素材免费分享下载,禁止商用。图片素材来源网络,版权归原作者所有,若有侵权问题敬请告知我们!
【友情提醒】:
因平台原因不易展示大尺度写真,有的写真展示越少代表此套写真越性感,特别是xiuren等写真每一套写真完整套图50-100张不等。更多内容的欣赏请移步 点击这里
【更多图集移步】:
每日更新-点击这里
漂亮小姐姐-点击这里
性感美女-点击这里
清纯女孩-点击这里
xiuren专栏-点击这里
整站资源下载-点击这里